How to Remove Recycle Bin from Desktop

 >
How to >
PC Recovery >
>
How to >
PC Recovery >
How to Remove Recycle Bin from Desktop in Windows
Desktop has a trash icon with crumpled papers inside? Congratulations, you found the Recycle Bin! Windows users would be quite familiar with the Recycle Bin as it is an indispensable part of your system. However, some people may prefer not to see it on their desktop. They wish to keep a tidy and clean desktop or set a unique one for an organizational and aesthetic look.
Whether you like Recycle Bin or not, it is an embedded part of the Windows system; you can only remove Recycle Bin from desktop, instead of deleting it permanently. This ultimate guide introduces you to the 3 feasible methods on how to remove Recycle Bin from desktop effortlessly, work for Windows 11/10/8/7. Start your PC now and follow us to have a try!

- Part 1: Why is Recycle Bin on desktop?
- Method 1: Remove Recycle Bin from Desktop with Windows Settings
- Method 2: Remove Recycle Bin from Desktop with Registry Editor
- Method 3: Remove Recycle Bin from Desktop with Group Policy Editor
- Bonus Tips: Recover Permanently Deleted Data from Recycle Bin Windows 7/8/10/11
- FAQs About How to Remove Recycle Bin from Desktop
- Final Words
Part 1: Why is Recycle Bin on desktop?
Embedded in the Windows operating system, the Recycle Bin is designed to store your deleted files and folders temporarily, which plays a crucial role in your data management, so don’t complain that it is always occupying your desktop. When you choose to delete files for your PC, instead of being gone forever, they will move to the Recycle Bin first, in case you delete something important by mistake.
Recycle Bin Icon Behavior
When you double-click to open the Recycle Bin on your Windows, it shows all the files, documents, or apps you have deleted from the desktop. If you want to retrieve the deleted files, you can right-click them to restore them. Besides, sometimes the files are too many to locate, you can use the filters, including Original Location, Date Deleted, Size, Item type, and Date modified, to look for. While you right-click the Recycle Bin, it gives the option “Empty the Recycle Bin”, “Pin to Start”, and “Properties”.
Recycle Bin Features
It is responsible for keeping your deleted items until you empty the Recycle Bin for permanent deletion or choose to restore them to your PC. Acting as the protective net, it endows you with a second chance to recover your accidentally deleted files with a few clicks. But it is this powerful feature taking up dick space, that makes some people empty Recycle Bin regularly. Under these circumstances, you may lose the chance to recover deleted files. The feasible way is to employ a professional data recovery software for Windows to recover your lost data easily.
👉 You may also be interested in: How to choose a best data recovery software for Windows.
Method 1: Remove Recycle Bin from Desktop with Windows Settings
Changing Windows Settings is one of the most effective methods to help you remove Recycle Bin from desktop. Quick and 100% working. The step-by-step guide is as follows.
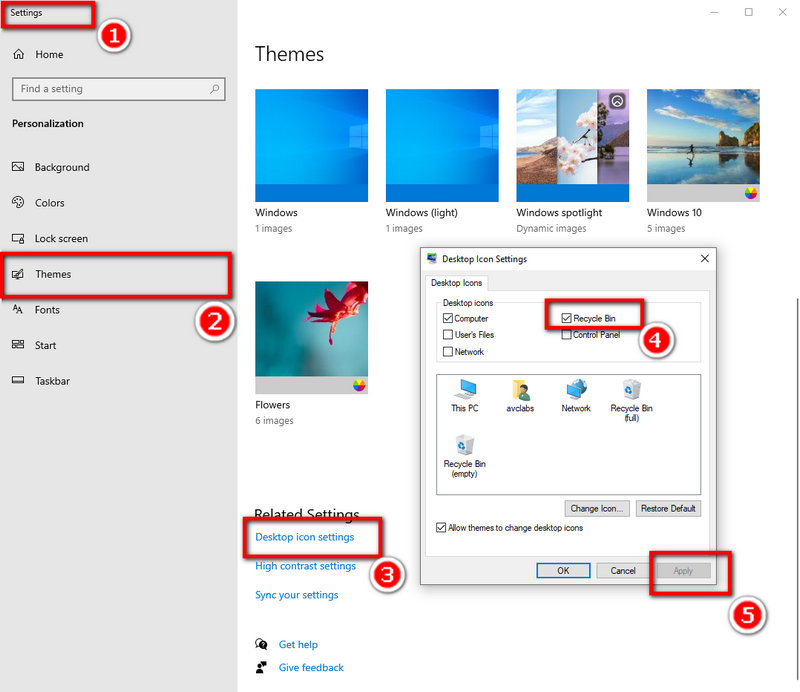
- Step 1: Open Windows “Settings” and then select “Personalization”. Alternatively, right-click anywhere on your desktop, and directly select “Personalize” from the context menu.
- Step 2: On the current Personalization window, simply tap the “Themes” tab from the left panel.
- Step 3: Scroll down and locate the “Desktop icon settings” under the “Related Settings”.
- Step 4: It displays the desktop icons. Uncheck “Recycle Bin” and click the “Apply” button. This method can successfully remove Recycle Bin from desktop and now you can close all the windows and enjoy your good-looking PC.
- ❗ Step 5 (for adding Recycle Bin back): If you decide to add your Recycle Bin back from the desktop, simply repeat the above steps and check the “Recycle Bin” box. After you confirm to apply, your Recycle Bin will appear again on your desktop.
To open Windows Settings, you can use the shortcut key WIN + R. Otherwise, you can type “Settings” in the Windows search box on the bottom left of your desktop. Next, in its pop-up window, select “Personalization”.
Method 2: Remove Recycle Bin from Desktop with Registry Editor
Making good use of the Register Editor can also help you remove Recycle Bin from desktop. Although the operation is easy, you should be cautious about not performing any redundant steps. Since a mistaken modification will cause harm to your Windows, it is suggested to back up the Windows registry in advance. Here is how you can do it.
- Step 1: Press WIN + R to initiate the Run command.
- Step 2: Type “regedit” into the Run box and Enter it. If your PC asks you if you allow Registry Editor to make changes to your device, click “Yes”.
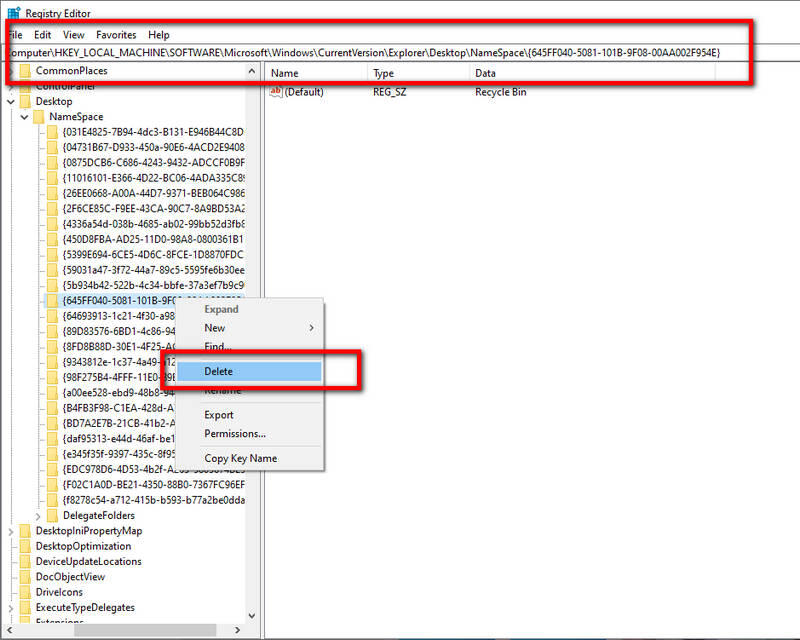
- Step 3: In the pop-up window, locate a file folder by this path: HKEY_LOCAL_MACHINE\SOFTWARE\Microsoft\Windows\CurrentVersion\Explorer\Desktop\NameSpace.
- Step 4: Look for the registry key: 645FF040-5081-101B-9F08-00AA002F954E under the target path.
- Step 5: Right-click it and choose the “Delete” option.
- Step 6: Close Registry Editor and right-click to refresh your PC. Your Recycle Bin icon will disappear from your desktop. If not, please restart your computer.
- ❗ Step 7 (for adding Recycle Bin back): To add you Recycle Bin back to your PC, you need to create a new registry key under the NameSpace path. Right-click the NameSpace, then go to “New” > “Key”. Input the same key you deleted in Step 3. This will bring your Recycle Bin back to your desktop.
Method 3: Remove Recycle Bin from Desktop with Group Policy Editor
When it comes to how to remove Recycle Bin from desktop, Group Policy Editor is a qualified tool for Windows users. It allows you to modify desktop settings as many as possible, including the Recycle Bin icon. Let’s see.
- Step 1: Press WIN + R to initiate the Run tool.
- Step 2: Input “gpedit.msc” into the Run box and press Enter.
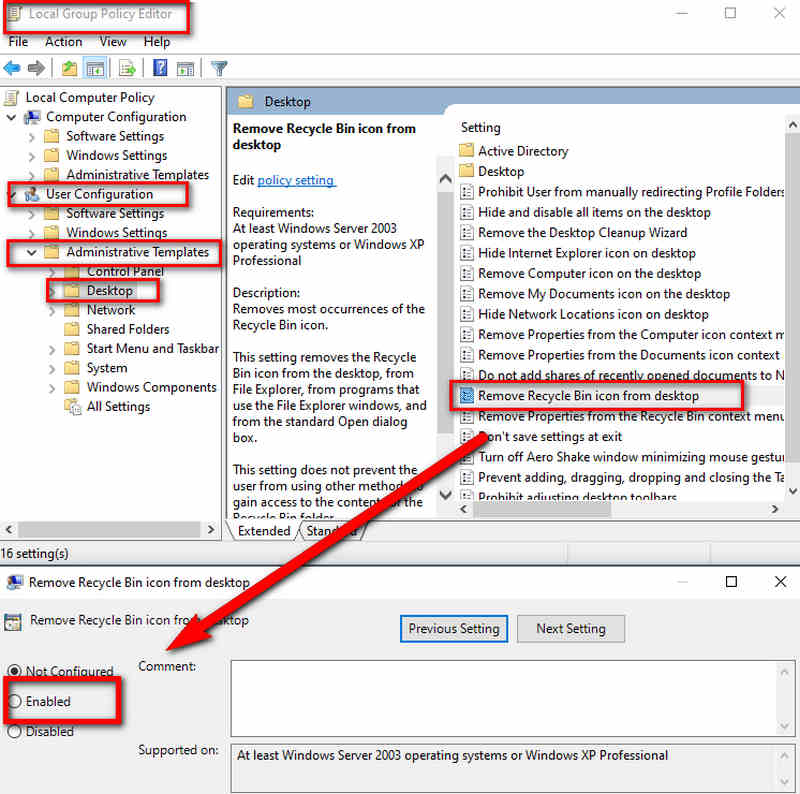
- Step 3: In the following pop-up window, locate “User Configuration” > “Administrative Templates” > “Desktop” in sequence.
- Step 4: In the right panel, find and double-click “Remove Recycle Bin icon from desktop”.
- Step 5: It shows you a new window, click the “Enable” button to turn on, and then hit the “Apply” button.
- Step 6: After implementing changes, simply restart your Windows, and your Recycle Bin will be removed from the desktop.
- ❗ Step 7 (for adding Recycle Bin back): If you wish to restore Recycle Bin icon, repeat the above steps. Next, select the “Not Configured” option in Step 6 to have your Recycle Bin back.
Bonus Tips: Recover Permanently Deleted Data from Recycle Bin Windows 7/8/10/11
While learning about the 3 practical methods that successfully help you remove Recycle Bin from desktop, you should note that removing or hiding the icon doesn’t disable its function. Your deleted files will still go to the Recycle Bin first even if the icon is invisible. More importantly, the inaccessibility makes it more difficult to find your deleted items because you can’t directly see the Recycle Bin on your desktop, and you might forget to check it before emptying it or ignore the loss altogether.
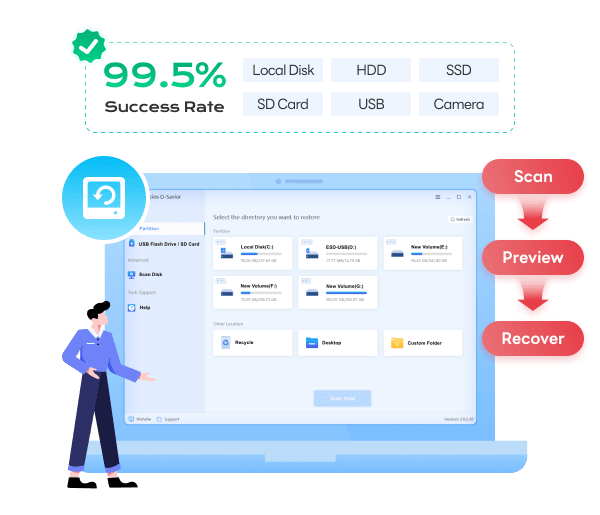
Thus, to remove Recycle Bin from desktop is to decrease the recovery rate of your accidentally deleted files. That’s where having a reliable data recovery solution becomes essential. Whether you’ve permanently deleted files, emptied the Recycle Bin by mistake, or lost data due to a system issue, Syncios D-Savior offers a powerful and easy-to-use recovery process designed specifically for Windows users.
Syncios D-Savior empowers you to recover 1,000+ formats of items, including but not restricted to images, videos, archives, programs, documents, etc. For the permanently deleted files from the emptied Recycle Bin, Syncios D-Savior can rescue them back with a simple 3-step process. Furthermore, it can be applied to multiple scenarios, whether you lost data due to an unknown virus or accidentally formatted your disk, Syncios is always your reliable choice.
 Syncios D-Savior
- Recover data from a formatted disk, hard drive, lost partitions, emptied recycle bin, etc.
- Recover data from an SD card, TF card, SSD card, USB flash drive, other storage media.
- Recover 1,000+ formats of images, videos, audio, folders, archives, documents, etc.
- Save recovered data to any desired location, including external drives.
- Provide detailed file preview prior to recovery.
- Support recovering data while scanning.

- Step 1: Install and initiate Syncios D-Savior on your Windows 11/10/8/7. In its main interface, it shows all the available partitions on your PC. Choose the location “Recycle” then press the “Scan Now” button.
- Step 2: Syncios D-Savior performs the scanning process with Fast Scan and Deep Scan. You don’t have to wait for its completion. Search for your deleted files by “Catalog” or “Type” on the left panel.
- Step 3: If you are not sure about the deleted photos you want to recover, you can select them and tap the “Preview” button on the right panel. It will show you all the thumbnails that can be recovered.
- Step 4: After locating your deleted files from the Recycle Bin you wish to recover, you can click the “Recover Now” button on the bottom right corner to begin the official recovery. Then in the pop-up window, hit “Directory” to choose another available file folder to preserve your files.
- Step 5: Within a few seconds, Syncios D-Savior will complete the recovery, then simply tap the “Recovered” button to check if your deleted files are well recovered to the output path you set in Step 4.


FAQs About How to Remove Recycle Bin from Desktop
1. How to remove Recycle Bin from desktop without deleting?
In fact, you can only remove or hide Recycle Bin from desktop intead og deleting it permanently; it will still run background. To remove Recycle Bin from desktop without deleting, you can use Windows Settings, Registry Editor, and Group Policy Editor to hide Recycle Bin icon. To access Recycle Bin after the removal:
- Step 1: Open File Explorer from Windows search box.
- Step 2: Type “Recycle Bin” in the address bar.
- Step 3: Look for the items in Recycle Bin without accessing from desktop.
2. How do I move the Recycle Bin from desktop to taskbar?
The Recycle Bin itself is a system folder and may not be added to the taskbar directly, but it can be done by creating a shortcut. If you directly create a shortcut by right-clicking the Recycle Bin icon, you still can't pin it to the taskbar. Instead, you need to follow these steps:
- Step 1: Right-click anywhere on your desktop. Then select “New” > “Shortcut” to create a new shortcut.
- Step 2: Type “explorer.exe shell:RecycleBinFolder” in the location box.
- Step 3: Hit the “Next” button and name it as “Recycle Bin”, then click “Finish”.
- Step 4: You will see this new shortcut is like a yellow file folder. Now you need to change this icon to the classic trash can icon. Right-click the new shortcut and then click “Properties”.
- Step 5: Under the Shortcut option, hit the “Change Icon” option.
- Step 6: Type “%SystemRoot%\System32\imageres.dll” in box to look for the classic icon standing for the Recycle Bin. Click to Apply this.
- Step 7: You will find the new shortcut has changed to the Recycle Bin icon.
- Step 8: Right-click the shortcut and select “Pin to taskbar” option from the context menu.
- Step 9: Now you have pinned your Recycle Bin to the taskbar. You can decide whether to delete the shortcut you just made or not.
3. How do I empty the bin on my desktop?
To empty your Recycle Bin on your desktop, simply right-click on Recycle Bin, then tab the option “Empty Recycle Bin”. If you empty your Recycle Bin by mistake, can’t retrieve the files you deleted, try to employ Syncios D-Savior to recover them with a few clicks!
4. Will removing the Recycle Bin delete my files?
No, removing the Recycle Bin from your desktop will not delete your files. However, emptying the Recycle Bin will permanently delete the files that are in it.
5. Can I delete the Recycle Bin completely?
Technically no. As we mentioned before, you can only remove or hide the Recycle Bin from the desktop, and its function continues to run in the background.
6. How to fix desktop icon not showing?
In fact, you can only remove or hide Recycle Bin from desktop intead og deleting it permanently; it will still run background. To remove Recycle Bin from desktop without deleting, you can use Windows Settings, Registry Editor, and Group Policy Editor to hide Recycle Bin icon. To access Recycle Bin after the removal:
- Step 1: Right-click on your desktop and hover your mouse over “View” > “Show desktop icons”. Make sure that your icons are enabled.
- Step 2: If system icons like Recycle Bin are missing, right-click the desktop and select “Personalize” > “Themes” > “Desktop icon settings”. This can bring your hidden Recycle Bin or other unshown system icons back.
Final Words
Refer to this ultimate guide on how to remove Recycle Bin from desktop with a few clicks. Besides, if you regret removing it someday, this article also provides you with the appropriate and simple steps to get the Recycle Bin back to your desktop. For users who can’t find the Recycle Bin to recover accidentally deleted files, or empty the Recycle Bin by mistake, it is recommended to use the professional data recovery software specialized for Windows like Syncios D-Savior to recover any important files instantly.
What's next? Download Syncios D-Savior now!
Ethan Mercer | Senior Writer
Related Articles
Related Solutions
Recover permanently 1000+ types of deleted files from both PC and 2000+ external devices.